Saturday, November 15, 2008

Moving on from the steering wheel


With the steering wheel being stubborn, I decided to switch gears and make progress elsewhere in the meantime.

Last weekend, we had drained the oil and fuel (I now know how to change my oil - super easy, but can be messy). The lesson learned from that process is to splurge and buy the nifty fuel container where you can pour the oil out from a spout. It looks like a gimmick, but really it would have prevented oil from getting everywhere as we tried to transfer the oil to a milk jug.

Chris' father was visiting this weekend and when they got bored of fixing the house, they came out to help me with the car. I had been trying to remove the bottom bumper, but the screws had rusted on pretty well. For two strong guys, though, this wasn't a problem and they got the bumper off in no time. I'd like to say, I micro-managed the effort.

With three people working on the car today, we got a lot done. The most accomplished in a long time. Today we removed the fuel tank, fuel line and filter, drained the radiator, removed the radiator and its mount, and removed the horn. Some progress, finally...

argh...steering wheel....


So, it's been over a month since my last post. October has come and gone, and the steering wheel is still on the car. We still couldn't get enough leverage to turn the nut. So we bought a breaker bar (like a socket wrench but it doesn't rachet and the handle is a foot and a half long). Bingo! the nut finally started turning.

Now for the past few weeks, the problem is removing the actual steering wheel. Apparently steering wheels are mounted in place using the physics property of friction. Even though the nut can be taken off and there's a clear path to freedom for the steering wheel, it refuses to budge.

First, we tried a hammer and pull method that was shown in a youtube video on an MG. I know some people said that this will damage the threads of the steering shaft, but given our limited tool selection this fit our needs. The method involved whacking the bolt on the steering shaft and pulling on the wheel. A couple whacks and pulls later, the steering wheel was still just as tightly on as when we started.

After I checked some online postings, I decided to try and use a steering wheel puller, a special tool designed specifically for this task, to remove the steering wheel. Also from online googling, I learned that you can borrow automotive tools, like a steering wheel puller, from Autozone. The Autozone people were super helpful and it turned out for a $21 deposit, I could borrow the steering wheel puller and could return it for a full return on my deposit. Sweet deal.

Well, despite the good news, it turns out that the steering wheel puller was not meant for 1968 Triumphs. The vintage car lacks the steering wheel holes that are needed to mount the steering wheel puller to it. Ugh, back to the drawing board.

So what's next...searching around on the internet, it turns out there is a different steering wheel puller that pulls by clamping down behind the wheel. This, I am hoping, will fit the Triumph steering mount. I'll need to check if Autozone has this available to loan. Otherwise, I think it'll be $30 to purchase it.

Also, on the not so bright side, examining the steering wheel mount closer, it appears that the previous owner had removed the steering wheel but prying it off and left indentations along the edge of the steering wheel mount. :-/ Poor car.

Sunday, September 28, 2008

Elbow grease...and a lot of it.

Today we removed the exhaust and muffler from the car. Only a few bolts and one wire were used to mount the exhaust so this was a pretty east part to take off.

On the tail pipe, I couldn't tell if it was rust or paint on the surface, but after giving it a good scrub with some steel wool, the shiny chrome underneath was revealed. With most of the chrome parts on the car, this appears to be the case. With a lot of elbow grease, this car can be pretty.

Removing the steering wheel has been tricky and thus far unsuccessful. After purchasing a 1 1/16" socket from AutoZone (couldn't find this size in the local hardware store), we tried to remove the nut holding the wheel in place, but it does not seem to want to budge. Even a good dousing of liquid wrench didn't help. Going to have to think about this one a bit more.

Now it really begins.

Last week, Chris' friend Paul stopped by to check out the car. Paul has been a british car enthusiast for many years and owns an MG. So it was nice to get an opinion from someone who has done this before.

After explaining our plans to Paul to rebuild the car from chassis up, Paul suggested we check out the chassis more closely to determine if this was actually needed or if we could get away with just working on the surface of the car and engine.

I finally got around to purchasing a 2-ton floor jack and 4 jackstands so I could lift up the car and inspect its undersides more closely. Before I actually went under the car, though, I made sure to shop-vac its underside for fear of some bug landing on my face while underneath the car.

The bottom of the car looked grim. The underneath of the floor panels were badly rusted, which was to be expected from what we saw in the interior. The metal had separated into rusted layers which could probably be peeled off with little effort. Conclusion: new floor panels are a must.

The chassis wasn't as bad, but was covered in surface rust. Rather than fixing up the car and leaving the chassis as is, only to have it break later, we decided the best plan would be to strip down to the chassis, clean the chassis up, powdercoat it, and work up the car from there. Granted, this will take a lot (a lot) of work and also cost more, but I would like to feel safe in this car while driving it 65 mph on the highway.

And so it begins. It's official now that this car will have to be completely stripped down for restoration and will not be operational for a good few years. It's going to be a big project.

Sunday, September 7, 2008

Tetanus shot...check.

It's been a while since I last worked on the Triumph. I've been either out of town or busy the past few weekends and haven't had a chance to work on the car.

Today, we finally got the bonnet (british term for hood) off, so things appear to be slightly more productive. Only a few bolts held the hood in and the majority of the time was spent tracking the wiring to the headlights and indicators.

Before taking the bonnet off we built 2 sawhorses out of 2x3 wood (I would recommend using 2x4 in the future and following instructions online for the ultimate sawhorse using an I-beam as the center structure) so that we would have something to prop the bonnet on.

We didn't start working on the car itself until after dinner, and were only able to work on it for a few hours until the sun set and the mosqitoes started biting.

Now about the title I chose for this blog. As we were moving the car back into the garage for the night, I managed to scrape my hand along a piece of metal that once held the side mirrors, and since there's so much rust on this car elsewhere, I'm pretty sure there's a lit of rust on the little piece of metal. Lucky for me, I got my last booster tetanus shot last year and although painful at the time (I hate needles), I am grateful for it now. Lesson learned: make sure you are up to date on your tetanus shot before starting a restoration project.

Sunday, August 17, 2008

Mickey?

I actually ended up working on the car one more time today and the event that occurred was worth documenting.

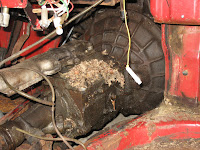
Chris finally removed this pesky choke housing cable that I could not remove, no matter how much liquid wrench I used. But the main event was removing the cardboard transmission cover on the inside of the cover. First off, it's made out of cardboard. Albeit, sturdy cardboard lined with heat shield padding, it's cardboard...er.

After removing the cardboard, we were surprised to find a rodent's nest, possibly a mouse or mice's dwelling. Thank goodness there wasn't a rodent still living there, otherwise I probably would have ran out of the garage screaming. I still had the heebeegeebees vacuuming up the nest, as I was afraid of the possibility a dead rodent would appear. Bleck.

Hopefully through all this, my tolerance for smells, insects, rodents, and whatever may lie ahead will increase, because going into this, I am a big wimp.

Slowly...

This weekend i went about removing the components on the dash board - a relatively easy task, I figured. Realizing I should probably take the time to document and record everything now, and save myself the headache of how to put it back together without documentation, I was careful to document which wire went where and how it was all connected. This task took a while and my patience for boredom was severly tested.

I wish I could say I did more this weekend, but that's about it. Look at wire, document wire, label wire with masking tape, remove wire, rinse and repeat.


The result...(well actually, I lie cause I did take off the air vent and top dash cover too, but after all this was too lazy to upload pictures....so there should be more red in the actual final picture.)


Sunday, August 3, 2008

"Good" is in the eyes of the beholder


When I first checked out the car, things looked good. All the body panels were in pretty good condition, the engine turned and the interior of the car looked to be in good condition. Upon closer inspection of the car, however, one slight issue revealed a big problem, something I was not planning on at all.

We decided to clean out the insides of the car (there were some leaves and debris from the car being stored outside under a tarp) and noticed an inch of water sitting under the chair. Wanting to dry this out, we removed both seats and found the seat tracks completely rusted. Trying to check the extent of the damage, we removed the interior carpeting (which had been thrown on with lots of hot glue) to find bad rust throughout the floor panels and along the edges. We could see the bottom of the garage through the floor panel, not a good thing. From underneath the car, only a rust hole was visible, but now with the interior removed, it's bad. Oh, and the sitting water had made the car stink...

Even better, it looked like the original car owner had tried to quick fix this "little" rust problem by covering the floor panels with flash metal and just folded it in to place. It was bolted into place by balling up some of the same metal material and shoving it through a hole. Awesome fix. Looking at the driver side, given a few more years of usage on the car, I'm pretty sure the driver seat would have just fallen through.

Car summary:
Engine: It turns and has been known to start within the last year.
Exterior: All panels are present. The original color was red, but the car had been repainted to silver. Now that I know about the rust on the floor panels, I'm worried that the silver paint may cover up some existing rust. I wouldn't be surprised it it did.
Interior: Like a Monet. Looked good from far away, but up close will need to replace everything.

UHaul...grrr

So my plan was in place to go to UHaul and rent an AutoTransport and save at least $100. I get to the UHaul place and am told that the Toyota 4Runner cannot tow the AutoTransport, even though I had checked online and with a representative that the towing setup will work. Confused, I called up the UHaul hotline and ask them whether or not my setup will work and am told it will work. Now I have the local UHaul saying one thing and UHaul national saying another thing. Since continuing with this seemed futile and wanting to get the towing done with, I started calling all the towing company numbers I could find being rejected because drivers were not in the area or that they would not do long distance towing until later that day.

My last resort was to use a towing company that I had seen negative online reviews for. It turns out they were great. I paid what other companies had quoted me, the guys met me within 15 minutes, and at the end of the day, I had a 1968 Triumph Spitfire sitting in the driveway.

Much thanks to my boyfriend for driving me around and putting up with my foul mood after being rejected by UHaul.

Thursday, July 31, 2008

Money issue #1

Moving the car from its current location in Boston, Masschusetts to 40 miles west in the suburbs. For this I had estimated $100 - $150. Boy was I wrong.

My initial plan was to rent a Auto Transport from U-Haul, but given that I currently drive a 1999 Camry, U-Haul would not let me tow an Auto Transport with my Camry. So then I thought to rent a U-Haul pick-up truck with the Auto Transport, but their pick-up trucks are not set up to hitch to the Auto Tranport. I would have to rent a 10’ truck to tow the Auto Tranport. This priced me at $188, as long as I stayed within the 30 mile distance. For each mile over, it would be another $.50, plus I also had to cover gas. Awesome, not.

My next option was to use a towing service, but after calling and emailing a few places, I was priced from “eh, about $200” to $250. Hmm…

Luckily, my boyfriend was able to borrow a co-worker’s SUV that I can hitch an Auto Transport to, which U-Haul priced me at $49.95. So hopefully, by this Saturday I’ll have a 1968 Triumph Spitfire sitting in the driveway.

The Beginning

I started this project because I was aimlessly browsing craigslist and came upon an ad selling a restoration project car for $900. Before I knew it, I was handing over a check for $900, completely ignoring the fact that I knew very little about cars. (I did check out the car first to make sure that there wasn’t too much rust.)

Some background info that makes this project more interesting…

Car experience: Not much. I know how to check my engine oil level, tire pressure…hmm, I think that’s it. My car knowledge is limited to what I have asked mechanics or found browsing online. I am very willing and eager to learn about cars, so that should count for something. I do now know what a carburetor is – it mixes fuel and air together .

Restoration Experience: Does watching American Hot Rod count? The closest project I’ve done to this was restoring a 1970s Huffy bike I bought for $20 off craigslist, which took 2 weekends to complete. This project may take a bit longer.

Tools owned: Scant. I have an IKEA tool set that I bought to assemble my IKEA furniture. I’m banking on using my boyfriend’s tools, but even that’s limited.

The Car: The car is a 1968 Triumph Spitfire MKIII. I think it looks awesome. It currently turns over, and has been known to start, but currently does not since the previous owner was in the middle of fixing the engine.

To date, this is the biggest project I have ever undertaken. I love projects, but am more of a project starter than project finisher. So hopefully, I’ll stick this one out, manage not to burn a hole through my wallet, and end up with a cool looking car.